
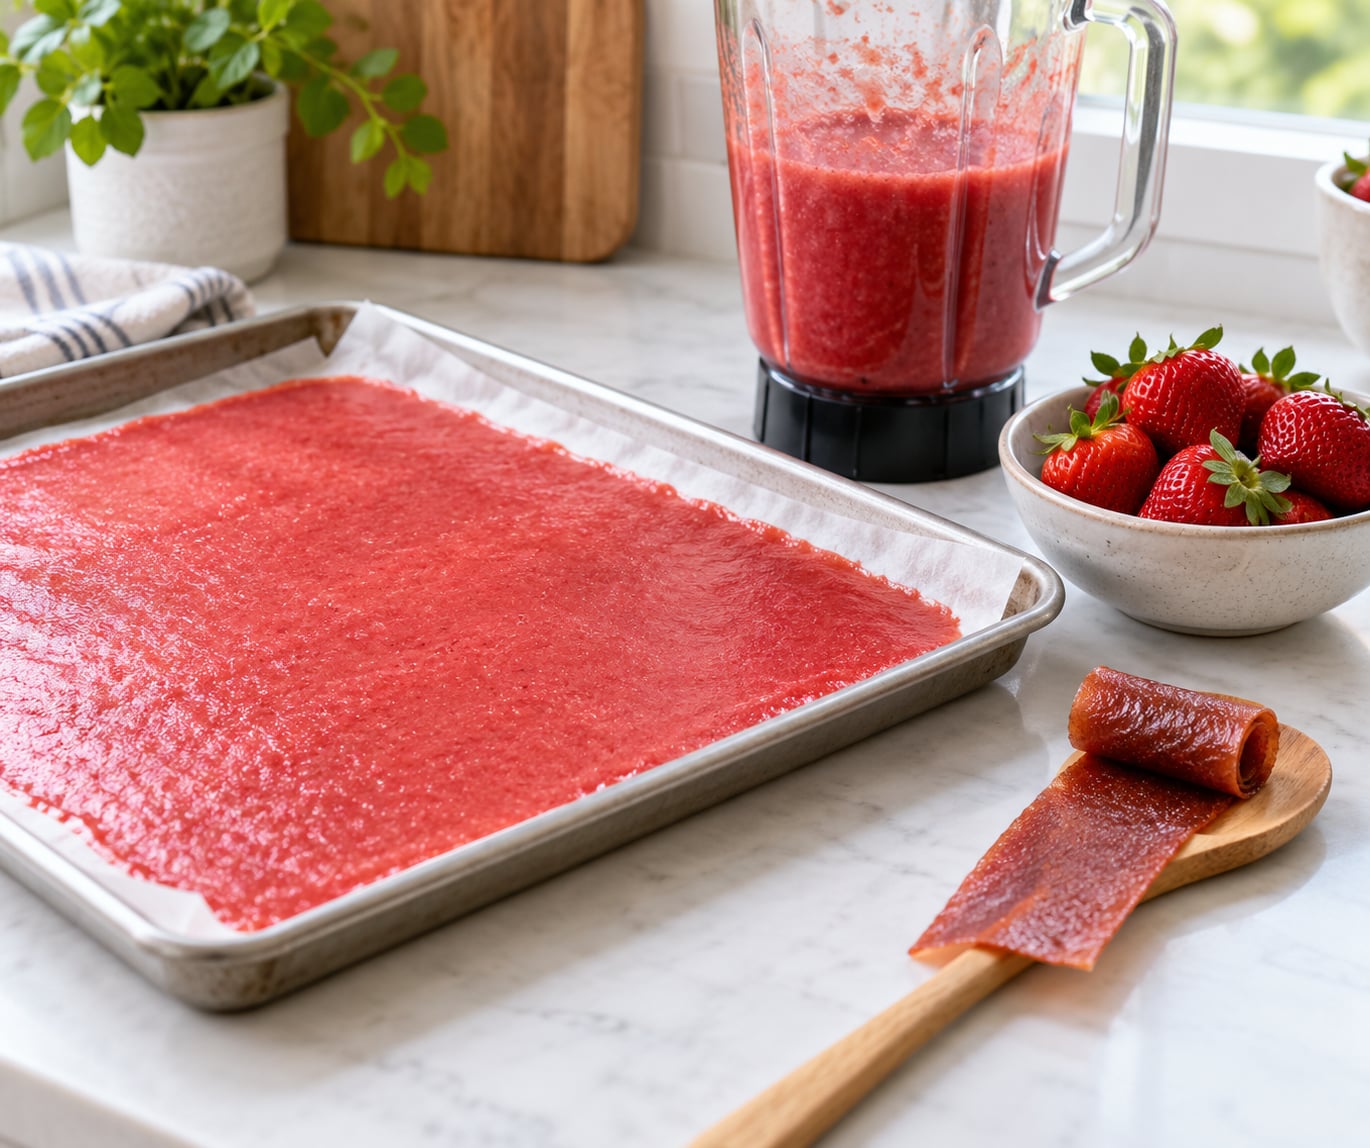
To make homemade fruit leather, blend ripe fruit into a smooth purée, spread it about 1/8 inch thick on a lined rimmed baking sheet, and dry it slowly at 135-140F in a dehydrator or at your oven’s lowest setting until the sheet peels off in one piece and no longer feels tacky. It takes 6 to 8 hours with a dehydrator, and you can do it with no special equipment at all.
Store-bought fruit roll-ups are mostly added sugar and corn syrup with a thin fruit coating. Homemade is the opposite: whole fruit, one tablespoon of lemon juice, and a sweetener you choose or none at all. It is also the easiest way to use up a bowl of strawberries that got a little soft, or the mangoes on your counter that need eating tonight.
A dehydrator gives you the most even result, but it is not required. Below I walk through the whole method, then give you the oven and air fryer versions so you can pick the one that fits your kitchen.
Table of Contents
What You Need
The equipment list is short, and most of it is already in your kitchen. The fruit is the part worth thinking about before you start.
Equipment
- Blender or food processor. A countertop blender gets the smoothest purée. An immersion blender works too if you purée the fruit in a pot.
- Rimmed baking sheet. The raised edge keeps liquid purée from running off the edge as it spreads.
- Parchment paper or a silicone baking mat. Both work. Parchment is cheap and peels cleanly when the sheet is fully dry; a silicone mat survives more heat and is handy if your oven runs hot.
- Offset spatula or the back of a spoon. For spreading an even layer.
- Sharp knife or pizza cutter. For cutting strips once the sheet is dry.
Do not use wax paper or tin foil. Neither handles oven heat well, and neither lets you peel the finished leather off cleanly.
Dehydrator owners can use the fruit leather tray inserts instead of liners, and plenty of people prefer them because the mesh lets air move under the sheet from the start. Forum regulars in the dehydrating communities consistently report using them over parchment for exactly that reason.
Fruit to Use
Choose soft, ripe fruit with smooth flesh. Overripe is fine. Bruised, moldy or fermented fruit is not, because those flavors concentrate right along with the sugar.
Good choices: strawberries, raspberries, blackberries, peaches, nectarines, plums, apricots, apples, pears, mangoes, pineapple, kiwi and bananas.
Hard to work with on their own: watermelon, grapes, oranges, tomatoes and cucumbers. They are too watery to set into a chewy sheet, and most batches turn to glue. Blend them with something starchy and they are fine, which is exactly why a lot of people add apples or a spoonful of applesauce to a berry batch.
What to Add
- 1 tablespoon lemon juice per 4 cups of fruit. It keeps the color bright and cuts the sweetness.
- Optional sweetener. Maple syrup, agave, honey, a few pitted dates or half a banana. Keep it to 1 to 3 tablespoons. More than that and the sheet will not dry evenly.
- Applesauce, blended dates or a peeled apple when you need body. This is the trick the National Center for Home Food Preservation recommends for reducing tartness and improving pliability, and it also stretches a thin batch of berries into something that will actually lift off the liner.
- Cinnamon, a squeeze of ginger or a drop of vanilla for a warmer flavor.
Frozen fruit works well. Defrost it in the fridge overnight, then drain off the liquid before blending so you do not dilute the purée.
Step-by-Step
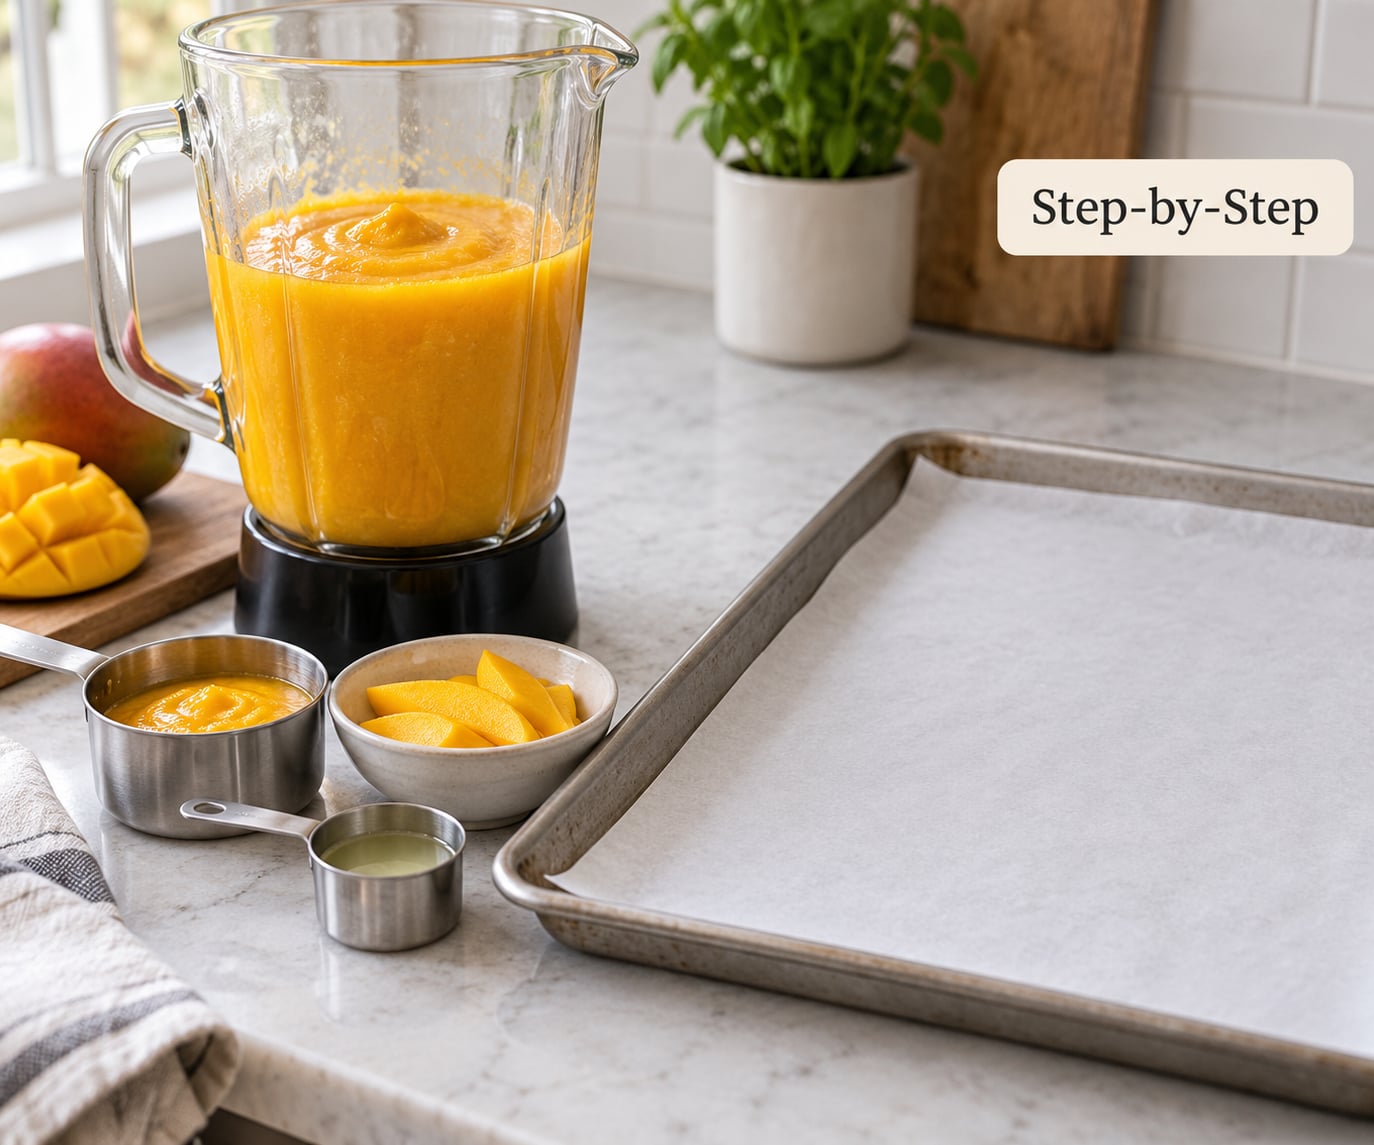
Step 1: Pick and Prep the Fruit
Wash the fruit, remove pits, stones and any bruised patches, and slice it so everything fits in your blender. Leave the peels on apples, pears and peaches if you want the extra fiber, but be honest with yourself about your blender; a blender that cannot handle skins will give you a flecked sheet.
How you know it worked: every piece is soft enough to cut with a spoon, with no hard or translucent chunks left in the pile.
Step 2: Blend the Purée Smooth
Purée in batches until completely liquid and free of seeds and stringy bits. Pass berry purées through a fine mesh sieve if you want a clean, glossy sheet rather than a seedy one. Stir the lemon juice in last, and add sweetener now rather than at the end, so it distributes evenly.
How you know it worked: the purée runs off the spoon in a steady ribbon with no lumps, and it is thick enough to hold a line for a second before closing.
Step 3: Spread a Thin, Even Layer
Lay your liner on the rimmed sheet, pour on the purée, and smooth it with the back of a spoon until it is about 1/8 inch thick. That is about the height of a couple of stacked coins. A 9×13 inch sheet takes roughly 2 cups of purée.
Keep the edges as thick as the center. The thin outer rim dries and shrinks first, which is what makes the sheet curl and crack when you try to lift it.
How you know it worked: the surface is level, glossy and matte-uniform, with no puddles and no bare patches of liner showing through.
Step 4: Set Up Your Drying Method
Dehydrator: set it to 135-140F and place the sheet on a rack in the middle. Oven: set it to the lowest temperature it reaches, usually 150-170F, and prop the door open with a wooden spoon so moisture can escape. Air fryer: use the dehydrate setting at 120-140F with the basket lined the same way.
How you know it worked: warm air is moving across the surface, and you can feel it when you hold your hand a few inches above the purée.
Step 5: Dry the Fruit Purée
A dehydrator at 135-140F needs 6 to 8 hours. An oven at its lowest setting runs 3 to 8 hours depending on the fruit and how wet your kitchen is. Check at the four-hour mark, then every hour after that.
Rotate the sheet once halfway through, especially in an oven, because the element is closer to the top of the fruit than the fan is in a dehydrator. That single rotation is the difference between evenly dried leather and crisp edges with a damp middle.
High altitude and humid weather both stretch this out. Above roughly 5,000 feet water boils at a lower temperature, so expect to add another hour or two, and expect the same in a summer kitchen running a dehumidifier on high.
How you know it worked: the surface looks dry and slightly glossy with no wet shine, and the edges begin to curl away from the liner on their own.
Step 6: Check, Peel, and Cut the Dried Sheet
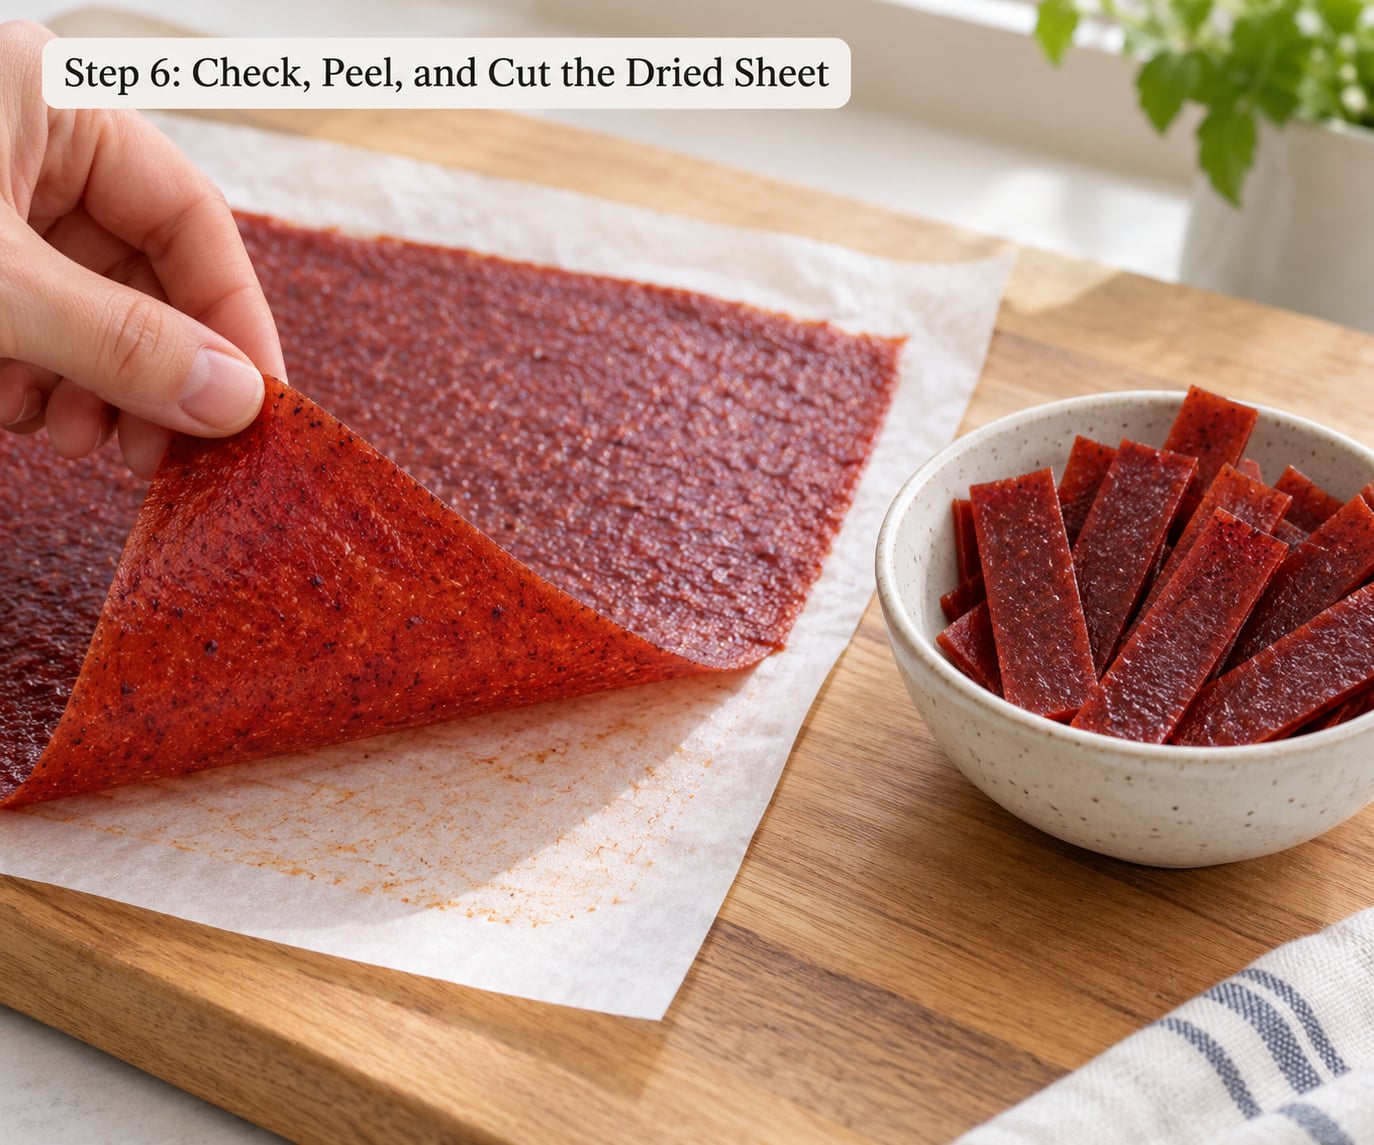
Lift one corner and tug gently. A properly dried sheet releases from the liner in one piece and flexes without cracking. Fully dry fruit leather is still slightly tacky and pliable, never crunchy and never glassy.
Let the sheet cool on the liner for 10 to 15 minutes before handling it. Warm fruit leather is sticky and tears, so this cooling pause is not optional.
Then peel it off, cut it into strips with a sharp knife or pizza cutter, and roll each strip. For a clean roll, dust the strips lightly with cornstarch first, or cut them a day ahead and store them flat with parchment between the layers.
How you know it worked: the sheet peels whole, bends into a soft curve without a single crack, and the strips hold their shape when rolled.
Common Mistakes
Nearly every bad batch traces back to one of five things: thickness, heat, moisture, liners or under-drying. Diagnose which one you hit and the fix is usually small.
Sticky or Wet in the Middle
The center is the thickest part and the last to give up its water. Pop the sheet back into the dryer, but use the top rack and rotate it often so the edges do not scorch in the meantime. If it stays tacky after a second long session, your layer was too thick, and next time you thin the purée with a little applesauce or concentrate it on the stovetop for five to ten minutes before spreading.
Burnt Edges and Soft Center
This is a thickness problem, not a time problem. The rim dried out and browned while the middle was still wet. Scrape the burnt edges off, return the sheet, and spread the next batch with the edges as thick as the center. Moving the tray to a lower rack or the middle of the oven also helps.
Parchment Sticks and Wrinkles
As fruit dries it shrinks, and parchment wrinkles with it, grabbing the leather as it goes. Smooth the liner flat and tape the corners down before you pour. If it still grips, let the finished sheet cool fully on the liner, then peel from the end nearest the rack instead of trying to lift a corner. A silicone mat rarely has this problem.
The Leather Goes Soft Again After Storage
It was not dry enough in the first place. A proper batch is dry through and slightly leathery, not leathery-squeaky. If you pull one out and it is tacky, return every strip to the dryer for another hour or two before storing.
Brittle Leather That Cracks When You Roll It
You dried it too long, or too hot, or both. Overdrying removes the last of the pectin and the sheet loses its stretch. Run a batch for two hours less, and pull it while it still has a little give. To soften a batch that is already too dry, roll it around a paper towel with a barely damp cloth for an hour.
Tips That Keep Batches Consistent
- Pour purée through a funnel or a jar with a spout for an even first pass instead of starting with a blob in the center.
- Weight two identical trays with a baking sheet or a cooling rack so the oven does not give you an uneven sheet again.
- Wipe the rim of the sheet pan clean before spreading. A clean edge peels; a sticky one does not.
- Do not pour sweetener straight onto the fruit. Mix it into the purée first so it disperses.
- Spread two trays, not four. Crowding a dehydrator blocks the airflow that makes the method work.
How to Make Homemade Fruit Leather Without a Dehydrator
An oven works, and most people get good results after one or two batches. The trick is heat plus airflow: low temperature and a door left slightly ajar so water vapor can leave instead of pooling under the parchment.
Set the oven to its lowest setting, usually 150-170F. Line a rimmed sheet, spread the purée 1/8 inch thick, and set it on the center rack. Prop the door open with a wooden spoon or a folded dish towel. Check after three hours, rotate the sheet, then check hourly until the leather peels free and no longer feels tacky. Expect 3 to 8 hours.
If your oven will not drop below 200F, you have two options. Let it cool fully between batches and use the top rack with a fan set low, or borrow the drying job to an air fryer at 120-140F on the dehydrate setting, 4 to 6 hours, with the basket lined the same way. People who own only an air fryer report it handles strawberries and apples well.
One workaround that shortens oven time considerably: simmer the purée in a saucepan for 5 to 10 minutes to boil off some water before you spread it. It concentrates the flavor and can nearly halve the drying window.
Expect different results from different ovens. The setting printed on the dial does not always match the temperature behind the glass, and every oven has a hot spot. Treat the times here as a starting point and trust the doneness test over the clock.
How to Store Homemade Fruit Leather
Dry fruit leather is a low-moisture, high-sugar food, which makes it one of the easier home preserves to keep. A batch made without added sugar dries and stores slightly differently than one sweetened heavily, so check it a little more often.
Room Temperature
Wrap the whole uncut sheet in plastic wrap or slide it into a resealable bag, then store it somewhere cool, dark and dry. Fruit leather keeps about a month this way, sometimes longer in a cool pantry. Cut strips keep shorter, so store those only if you are eating them within a couple of weeks.
Refrigerator
Wrap strips individually or layer them with parchment in an airtight container and refrigerate. They stay soft and chewy for 2 to 3 months. This is the option most people land on, since refrigerator-stored leather stays pliable rather than turning leathery.
Freezer
Roll the sheet, wrap it tightly, and freeze in a bag or box for up to a year. Thaw at room temperature while still sealed so it does not pick up moisture, and it comes back close to fresh.
Label every container with the date. Before serving, look for mold, an off smell or a slimy surface, and throw the batch out if you find any. Do not taste to test it.
If you like the flavor, roll two strips into one snack, or chop the leather into small pieces and toss it into a homemade trail mix. Cut a sheet into strips with a cookie cutter and it becomes the kind of lunchbox treat that survives a school day, which is the reason most people make a second batch.
Frequently Asked Questions
Do I need a dehydrator to make fruit leather?
No. A dehydrator gives the most even drying, but a home oven at its lowest setting with the door propped open works well, usually in 3 to 8 hours. An air fryer on the dehydrate setting at 120-140F is a good third option. Whichever you use, spread the puree 1/8 inch thick and stop when the sheet peels free and still feels slightly tacky.
What is the best fruit for homemade fruit leather?
Soft, ripe fruit with smooth flesh gives the cleanest sheet. Strawberries, peaches, plums, mangoes, pineapple, apples and pears all work well, and very ripe fruit is fine. Watermelon, grapes and oranges are too watery to set on their own, so blend them with apples or a spoonful of applesauce to give the puree body.
How thick should I spread fruit puree for fruit leather?
Aim for about 1/8 inch, roughly the height of two stacked coins. A 9×13 inch pan takes around 2 cups of puree. Keep the outer edges the same thickness as the center, because the thin rim dries and shrinks first, which is what makes a sheet curl, stick and crack when you try to lift it.
How long does it take to dehydrate fruit leather?
A dehydrator at 135-140F needs 6 to 8 hours. An oven at 150-170F with the door ajar takes 3 to 8 hours, and an air fryer on dehydrate at 120-140F takes 4 to 6 hours. Rotate the tray halfway through and check from the four-hour mark, adding time for humid weather or altitudes above 5,000 feet.
Why is my fruit leather sticking to the tray?
Two causes cover almost every case. The layer was spread too thick in the center, so it never fully dried, or the liner wrinkled as the shrinking fruit grabbed the paper. Smooth and tape the parchment before pouring, keep the layer even, and peel only after the sheet has cooled completely on the liner. A silicone mat sidesteps most sticking.
Can I make fruit leather in an oven?
Yes, and most people do. Set the oven to its lowest temperature, usually 150-170F, and prop the door open so moisture escapes. Use a rimmed baking sheet lined with parchment paper, never wax paper or foil. Simmering the puree for 5 to 10 minutes before spreading cuts the drying time roughly in half.
Conclusion
For your first batch, pick the softest fruit you have, add a tablespoon of lemon juice, and spread it thinner than feels right. Thin layers dry before they burn.
Give it the full drying time, cool it on the liner, and stop when the sheet peels off whole and stays pliable. Keep the finished sheet wrapped in the fridge and you have a snack that lasts a couple of months.
Once that batch works, try a second one with applesauce for body or a spoonful of maple for sweetness. If you make the sheets ahead, they also make a good smoothie base, or chop a frozen sheet into small bits and fold it into banana ice cream made in a regular blender.